Affichage des articles dont le libellé est Dress. Afficher tous les articles

samedi 7 novembre 2015

Me Made Halloween: Sally

I made a Halloween costume! This year I actually came up with a good idea and managed to execute an actual costume on time for halloween (as opposed to slapping on an old black dress and some face make-up at the last minute and calling it "dead woman", which is what I have commonly done in the past).

The idea started with a red wig that I purchased recently for another event. I really wanted to make the most of it, so I started looking up ideas using a red wig and came up with Sally, the rag doll from Nightmare Before Christmas. It was so perfect! I've seen this movie many times when I was younger and the character's dress was the perfect project for a handmade outfit since...it's a handemade patchwork-type dress.

So after my activewear sewing marathon (posts and photos coming soon!), I launched myself into a Halloween sewing marathon, with one week to complete the costume.

I didn't have time to go to the fabric store, so instead I bought a few items at the thrift store near my work. I looked for garments of the right colors, big enough that they would produce enough material. I was pretty lucky and found all the right colors. I also had a black man's shirt in my stash that had been there forever waiting for a refashioning and so I decided this was going to be it!
The pieces of the dress all have different prints, so I bought fabric markers from Michael's to draw the prints by hand. I also got a big darning needle and some fingerweight yarn to do the "topstitching".


For the pattern, I used the same as my summer dress from last year (burda magazine 108-04-2010). It had the right silhouette to match Sally's dress. I only had to trace the long version of the sleeve which I didn't use before. The pattern comes with one full piece for the front and one for the back (no waist seam) so it was also easy to split them up into the different patchwork pieces. 

First I traced the second half of each side in order to have a full front and back. Then I drew the lines for each piece, using pictures from the internet as guide. On each piece I wrote what colour and what "print" would be used, and I also added numbers in each corners, matching those numbers in the corners of the other pieces it would attach to. This was to make sure I wouldn't get all the pieces mixed up and not know how to reassamble them once cut.


Once I cut all my pattern pieces I cut the fabric each color at a time. I actually left the pattern attached to the fabric until I was ready to sew that piece to the rest, again to avoid confusion.

 
I had made some adjustements to the pattern (slightly more A-line skirt and longer hemline), which I ended up coming back on when I sewed the dress together. It was too long and too wide. So i detached the pieces that were connected around the waist and removed about 5cm of heights from those pieces. I used the bust darts from th pattern but omitted the back darts so I had to get rid of the excess fabric at the side and "center" seam.

Once I was happy with the fit,  I started doing all the print drawing. I placed a piece of cardboard inside the dress to avoid the paint transferring to the other side. The reason I painted the dress after sewing it and not before is that some of these pieces wrap around the side - there is a side seam but I wanted them to appear like one continuous piece around the side, and I didn't want to have to do pattern matching, so it was easier to draw the print over the side seam after it was sewn.
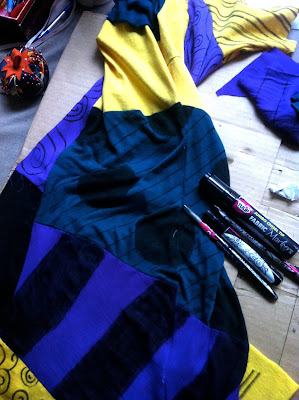

And finally I topstitched all the seams with the yarn for the final touch.


I'm really happy with the result, it looks pretty legit. Now, those are not the colors of the actual doll in the movie (because the movie is so dark, everything is more toned down and muted), but because I had the bright red wig I decided to go with the brighter version of this costume.

I got some white tights from American Apparel, and the stripped "socks" are actually sleeves I chopped off a trift store shirt - I couldn't seem to find simple black & white stripped sockes anywhere so that ended up being the best option.

For the face make-up, I researched online a bit. I didn't want to buy too many elements that I would only be using for halloween. A couple years ago I came accross this you tube video that suggested using Lise Watier's corrector wheel to make pale faces, thanks to the blue and green correctors. I already had the wheel so I used it. As a base I also used the NYX jumbo eye pencil in White, as suggested in this video. I found a couple of black and white eyeliners for 1.99 at London drugs, and I also purchased the cheapest blue eye shadow palette I could find.


With that I was set, and after watching a few different tutorials, I kind of made up my own version of it. Being a wearer of high-prescription glasses, I always find it frustrating to do eye make-up, because it will barely be visible in the end, but oh well...

I went to a couple of house parties on Halloween night and got lots of compliments on my costume, so yeah, pretty pleased with myself! Definitely one, if not the best costumes I've worn...
 
With my friend Luigi, ready to go meet Mario...


vendredi 29 mai 2015

Finished Project: Knit dress

This is Vogue 1315.  I found the pattern in the $1 bin at Fabrics, ect... in Vancouver. It's a loose-fitting dress with elasticated dress, with pleating and slouchy pocjet design which make it a bit more interesting than just plain knit dress. I bought it thinking it would go into my stash to be made at a later time, but when I saw this fabric on the top of my stash, I thought it would be a could match, and an easy project to complete.


The fabric is a wine-coloured cotton jersey bought at Gala Fabrics shortly before they closed down.It's a medium weight with a good balance of body and drape.
The most complicated step when making the dress was figuring out how to fold the pleat on the skirt before attaching the pocket. The instructions where pretty straight forward but I mistakenly made the pleat on the wrong side, which I only realized later on when trying to line up the sides of the dart and they didn't match up. Fortunately I was able to reverse the darts without having to undo all the pocket seams.


The top was a no brainer. The only thing I modified was the neckline. The neckline is supposed to be finished with two ovelapping bands with raw edges, which, when using the proper fabric weight/content, end up rolling down. I liked that design detail but my fabric would just not roll (it was either too heavy, or maybe 100% cotton doesn't roll the way lycra does?). Anyways, I didn't want to waste the pieces so I ended up sewing both bands together along their longer edge. Since one was narrower than the other, when folding in half lengthwise, the seam did not end up on the fold, but on the inside, which was perfect to conceal it.


I then attached the band to the neckline and finished it with a pretty stretch topstitch.

I attached the sleeves to the shoulders first, then sewed the sleeve seam and side seam in one go. Adding the elastic at the waist was easy,. The casing for the elastic is created by folding the seam allowance from the bodice down towards the skirt and top-stithing in place. I finished the hem with the same stretch topstich as the neckline.


Confession: I haven't actually finished the sleeve hem yet ( I was too eager to wear it). I don't think I will leave it raw, but because I like the look without any top-stitching, I might try to use an invisible hem.

Fitting-wise, I made the following pattern alterations:
Added 2.5 cm (1 inch)  to the bodice length
added 2.5 cm to the skirt along the cutting line, as well as 7cm at the hem (and boy am I glad I did, the original length would have been a tunic on me).
Added 2.5 cm to the sleeve length.
I also took out about 1inch at the armhole, tapering to nothing at the elbow and waist.


If I make this dress again I might try to cut the bodice in a size 8 instead of 10, or maybe remove 1.5-2cm from the center front and back, to make the necline slightly less wide and bring the shoulders closer to center.
Overall I'm quite happy, this is a very comfortable dress, easy to wear, I'm pretty sure it's going to be a regular in my clothing rotation.

jeudi 18 septembre 2014

Finished Project - One last summer dress

On a trip to Fabricana in early July, I was supposed to only get some swatches of fabric for a special project...But of course, I fell into the remnant bin and came out with 3 random pieces of fabric.

One of them was this pink/purple cotton with a mix of tie-dye and batik print. I couldn't resist. I knew it was going to be my last summer dress of the year.


The piece was fairly small (about 115x140cm), so I had to keep it simple. I really wanted an easy dress, the kind that you just slip on on hot summer day, that's effortless and breezy, and doesn't need any addition. 

It had to be sleeveless, but I wanted to be able wear it to work, so I ruled out spaghetti straps, and I didn't want something too loose or flowy - the fabric has a nice body and wouldn't really work as well with a flowy shape anyway.

I had a lot of criterias in mind but couldn't decide on an actual silouette.

I actually looked at a lot of dresses online, hoping to pinpoint what I really wanted, and thinking I would know it when I saw it, which didn't totally happen. Eventually though, i decided it would have a v-neck and some sort of a mock-wrap bodice - I couldn't do a real wrap since I didn't have enough fabric.


For the pattern, I decided to go with pattern 108 from April 2010 of Burda magazine, which matched my idea of faux-wrap with the under-bust seam. The main design detail on that pattern are the pleats, which I removed completely by taping them out on the pattern piece. The pattern starts with size 38, so I had to grade down to a size 36.


For fit alterations, I did my usual:
-Sway back alteration
-forward shoulders adjustment
-back shoulder dart to prevent armhole gaping
-took in at the the center back seem 
-lowered bust dart by 1.5 cm

For design changes I:
-left out the sleeves and didn't add seam allowance on the armholes, so that the shoulders would end up a bit narrower.
- designed a low neckline in the back.


I wanted it to be a fast and simple project, aka, no muslin. I've been using the swedish-type tracing paper, which is great for pattern fitting, since it doesn't tear.  I was able to check the fit by pinning the pattern pieces together and putting them on, and it was actual quite good right off the bat.
I didn't have to adjust the bust length as I often do, and I didn't need a small bust alteration either. There were actually some pulling lines under the bust, which I managed to get rid of by lowering the bust darts about 1.5 cm.

I cut the fabric and basted all the piece together to check the fit in the fabric. The fit of the front was actually very good, if only a little loose, but I was ok with it.


I decided though that I wanted the neckline a little lower, so i recut it.
Then I proceeded to sew the garment for good.
Unfortunately, once all sewn back up, i realized the neckline was now massively gaping on the right side. Not sure what happened, I cut both side symmetrically, or so I thought, but somehow something went wrong. To fix that I had to slip the left bust piece to hit higher on the righ side, to get rid of the gapping. This meant I had to take in a good 2cm on the left side below the bust seam, tapering down to nothing at the hem, to accomodate for the now offset pieces.
In the end, the fix worked. The dress is slightly more fitted than I originally intended, which is actually fine as I can wear it without a belt. It does mean that the main front piece is now technically a little off-grain, so i guess the side seam could start turning after I wash it a few times. This is a pretty sturdy cotton fabric with no stretch though, so I'm hoping it won't happen.

The neckline ended up slightly off (the point of the V is not quite centered), but it's not too noticeable.

I did french seams on the inside and finished the neckline and armhole with bias tape and top stitching - I'm actually quite pleased with my finishing of the neckline point, it's very neat.

In the end, I'm very happy with this dress, it's pretty much what I had in mind (even though I wasn't quite sure what I had in mind). the faux wrap is barely visible (but I know it's there! )

I made sure to complete this dress just before flying to Montreal for a long week-end at the end of August, as I knew Vancouver weather was already getting too cool, and that week-end might be one of the last opportunities to wear it before fall came.
These photos were in fact taken last tuesday on what seems to have been the very last day of summer, as the rain has now started to fall on Vancouver.


jeudi 26 juin 2014

Finished Project: Neon Dress

I whipped up this dress in two evenings, after decided on a whim to make it for an office party.
The party theme was neon. At first I didn't want to buy anything as neon isn't really something that I wear a lot of. So I tried borrowing from friends but didn't really find anything I flet comfortable wearing. So I started looking in stores afterall, but couldn't find anything that I thought I'd wear again. Finally, a co-worker and I were going to the fabric store to pick up neon fabric to make table clothes, so i though "heck, I'll just make a dress".


I found this awesome print in the polyesther section. I don't usually go for synthetics, but this one was just so perfect. At $26 a meter, it's also significantly more expensive than what I usually pay, but the polyesther is really good quality, super soft and buttery. It was a bit too light to be used just as is though, but instead of doing a lining, I thought I wouldn underline the main fabric with a black fabric of similar stretch and weight.
I found some super soft black lycra in the knit section and knew it was going to work. I also picked up a bright pink exposed zipper for the back closure.

Both fabrics were a dream to work with, easy to cut and with no fraying, and super forgiving. I'm pretty sure I could use the remnants to make a bathing suit (I think I just might).


Since I didn't have time to make a muslin, I thought I'd use a pattern I'd already made: I used Pattern 107 from Burda magasine March 2009 (previously seen here ).
It is a simple shift dress with raglan shoulders and princess seams, which makes it super easy to adjust the fit of, since I can just pinch the excess along the princess seams where needed.


Back when I made the first one, I had no concept of pattern adjustments, so when I put it on, I could see all the issues, but also how to fix them. Also by now, I've figured out most of the adjustments that I pretty much need to make right off the bat:
- lowered the waistline by 2 cm
- did a forward shoulder adjustment
- sway back adjustment: this one was interesting. The amount of fabric I was able to pinch on my original dress was crazy, so I ended up taking that extra fabric out in two places on the pattern (I read a tutorial suggesting to do that, but I can't seem to find it online). As a result, I added quite a bit of fabric in the CB to make the CB seam straight, which I ended up taking in anyways on the final dress. Not sure if that was the right process, but in the end it worked.
Additionnally, when putting the dress together I did the following:
-Took in about 1cm from princess seam at bust point, tapering to nothing at waist
-took in 1 cm from side seams at hips, tapering to nothing at bottom hem
- shortenned the dress by about 2 1/2 inches.

 
also love my bright lipstick: MAC Impassionned

I finished heming the dress on the morning of the event, and didn't even bother finishing any of the seams at first, for lack of time - i went back later to trim allowances etc, but the insides were a pretty big mess when I first wore it)

I'm super happy with how the dress turned out. Thanks to the stretch and the weight of both fabrics combined, the fit is pretty much perfect, and the dress is actually incredibly comfortable to wear. I also can't get enough of this print. That green is so bright, it looks like it might glow in the dark (it doesn't). I'll definitely wear it again to go out!


jeudi 13 mars 2014

vendredi 30 août 2013

Finished Project: My Breton Dress

This was a totally improvised project, that I decided to make on a whim for a company party. It ended up being a summer favorite.


The company I work for organised an evening cruise to celebrate the end of a project. They rented a boat for 4 hours to have dinner and sail around the bay. When I heard "boat party", I immediately thought "nautical" and summer dress. I didn't have much time to make anything complicated, and since it was going to be a rather casual affair, I decided on a simple maxi dress.

I found the perfect striped fabric in clearance at Dressew - it's a knit, probably mostly polyesther but it's actually not bad quality, and for $3 a meter I wasn't going to complain. I got 3 meters of it.


I traced a RTW tank top of mine for the neckline and armholes/shoulders and used BOWF pattern 109 from June 2013 for the rest of the dress, connecting the two just below the armholes.

The fabric is actually a bit heavy, so I finished the armholes and neckline with twill tape, to prevent them from stretching in the long run. I eye-balled the hem length and let the edge raw, as it doesn't fray. I left it long enough that I could wear with heels or belted and bunched up if I'm wearing flats or want it slightly shorter.


The dress came together super fast and it's exactly what I had in mind. I had wanted a maxi dress for a while but never liked the ones I saw in the shops. This one is perfect and I will for sure be making more of this pattern. The only alteration I might need to make is to add a tad more ease at the bust, depending on the fabric I use. The tank top I traced has slightly more stretch than my fabric so the dress came out a little tighter in the top part, but it's still very comfortable.


The setting for the photo shoot became obvious as soon as I finished the dress. I knew I was going to France on vacation and the first few days would be spent in St Malo, Brittany. That's basically where Breton shirts come from (there were at least three stores selling them just on the way to the beach).


The beach is Bon Secours, at the foot of the medieval wall that surrounds the oldest part of the city ("intra muros"). I hadn't been back to France in over four years, and it felt so strange to hear everybody around me speak French, I almost felt like I was in a foreign country....