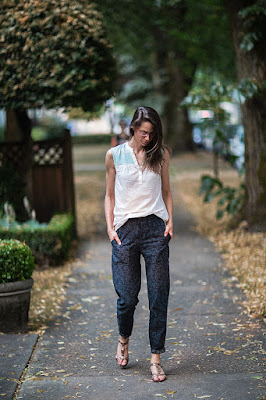
This year has not been a very productive one so far - this is only the third item on my #2017makenine. But still, I'm chipping away at it, slowly!
I don't usually wear this type of looser pants, but I always thought it would be super comfortable, especially in the summer. I can't remember where I bought the pattern from, but it was probably on sale somewhere. As a matter of fact, I can't remember where I got the fabric either, possibly from Gala fabrics before the closed down their South Granville location.
I don't usually wear this type of looser pants, but I always thought it would be super comfortable, especially in the summer. I can't remember where I bought the pattern from, but it was probably on sale somewhere. As a matter of fact, I can't remember where I got the fabric either, possibly from Gala fabrics before the closed down their South Granville location.
The fabric had been in my stash for a while. It's a medium-weight cotton, which makes it a pretty versatile fabric, suitable for a number of garments. When I first bought the pattern, I didn't remember about this fabric, until i went through my stash and figured it could be a good pairing. I didn't have any sort of emotional attachment to this fabric, so I figured I could treat it as a wearable muslin.
The pattern is Burda 6725 (from the "young" collection). Based on finished measurements on the pattern, I decided to cut the smallest size, size 32. I added about 3cm of length above the knee, and 2.5 cm below
After sewing the patch pockets on the front and back in place, I machine basted the pieces together to get an idea of the fit. It was pretty good right off the bat, but I actually though it might be slightly too snug, especially when sitting. So I decided to only use a 1cm seam allowance instead of 1.5cm. Later I ended up taking about 1 inch at the centre back seam, tapering to nothing at the crotch. So maybe I should have stuck with the original seam allowances...
Construction came together without a hitch, it was all pretty straight forward and instructions were clear. The one thing I had to adjust was the waist band. In the original design, only the right side extended into a tab that overlapped the left side. Somehow my waistband ended up slightly short at centre front, so I extended it by adding an 1"1/2 piece on the left to also overlap with the right side - allowing the button to be a bit more centered too.
The pattern also didn't include a "zipper liner" (not sure that this is the appropriate term), you know that piece of rectangular fabric that sits between the zipper and the skin. Not indispensable I guess, but probably more comfortable and it was super easy to add. All I did was cut a rectangular piece of fabric, folded it in half, and attached it along the zipper seam allowance on one side.
The pattern also didn't include a "zipper liner" (not sure that this is the appropriate term), you know that piece of rectangular fabric that sits between the zipper and the skin. Not indispensable I guess, but probably more comfortable and it was super easy to add. All I did was cut a rectangular piece of fabric, folded it in half, and attached it along the zipper seam allowance on one side.
One thing that is tricky about pants (amongst all the other tricky fitting issues) is knowing where the waistband is supposed to fall. Burda magazine patterns often have an indication of where the waistband should fall compared to your natural waist. But when that information is not available (like in this case), I always have a bit of trouble figuring out how tight the waistband should be, so it falls in the right spot, and as a result, knowing if the crotch is deep enough, if the hips are too big, etc...
So in this case, when I first basted the pants together, they seem to fit well, but after I put all the pieces together for good, it felt like the waistband was a bit loose and maybe hitting lower than it should? Hard to tell. In any case, the result is ok, not perfect but I can live with it. There's a bit of extra fabric below the butt and around the thighs that I would maybe try to get rid of if I sewed this again - which I actually might because these turned out to be very comfortable pants to wear on summer days.


.jpg)


