Affichage des articles dont le libellé est Patterns. Afficher tous les articles

dimanche 30 mars 2014

Burda Easy fashion - Spring 2014

I regularly go to the French Burda magasine site to check out the latest issue before deciding if I want to buy it. This time the issue of Easy fashion - Spring 2014 was available. I took a quick look and I was very happily surprised by the patterns.

First, this cute little bomber jacket. I've seen quite a few around the blogoshpere (mainly the Rigel Bomber jacket by Papercut Patterns, which had me really re-think the idea of that style). I think I might actually prefer the higher, rounder neckline on this one:
 

I've also been dreaming of making bustier tops, for the summer or to wear under a cardigan/button down shirt. This one looks like a good one to start with. It also involves sheering in the back, which would help with fitting:


 But the big ticket that made me want to definitely buy this issue was this jumpsuit:


It is basically the same bomber jacket as above, but attached to pants. I feel like it could be really nice and comfortable in a light, silky fabric. I actually quite like the photographed version. And the best thing, there are two other variations of this jumpsuit, all based on the same top and pants:


Three quarter sleeves and shorter hem, with a tie neck instead of mandarin collar. Love.
And for those hot summer days:


Sleeveless and shorts. Love. Love. I can see it in a scarf-type fabric, maybe with a solid color for the sleeve yokes.

Jumpsuits have been on my sewing dreamlist forever but I never found a pattern that I was 100% convinced by until now. I like that these have raglan sleeves and a front zipper, it's different from the more classic button down or wrap/drape front. I want to make all three versions. And the best part is, once I fit one, I can basically make the other two with the same alterations.

This is another thing that I really liked about this issue, is that a lot of the pieces are used in different variations and paired together to form another garment. For example, the dress below is basically the bustier top from earlier, paired with a skirt thst also come as a seperate pattern:


It may seem like a cheat (you're not getting as many patterns as it seems), but I actually think it's really smart, especially since these "easy" issues are, I assume,  targetted towards less experienced sewers. It's a great way to introduce the idea of "frankernpatterns", while still making it easy and accessible to create a variety of garments.

I'll end on two more cute looks: wrap skirt and cross top on the left, another version of the bomber jacket and cute shorts on the right.


I went to my local newspaper store, but they didn't have a copy of this issue. I feel like they only get 1 or two copies of the Easy issue and i didn't want to risk missing it, so I asked my mom to find it for me in France (I'm sure she'll have no trouble), and send it via post. I can't wait!

vendredi 18 octobre 2013

Burda magazine October 2013

I haven't bought an issue of Burda Magazine in a while, but this one had a few patterns that called out to me:


This batwing shirt looks very comfortable and I like the idea of playing with different fabrics for the side and the center panel


I love a good winter dress and this one looks perfect. it's made out of knit, which means it's comfortable, and I  like the unusual pleats on the skirt front, for an interesting detail. This one is most definitely going on my list for this winter.


This is an good boxy top with interesting seam lines, I could see using a two-sided fabric to create contrast between the different sections of the top. The skirt worn with thie is actullay also a good simple skirt with topstitchin on the pockets. For a leather skirt maybe...

That's my pick for this month, to be added to the never ending list of projects. I'm a little late as I know some people are already reviewing the November issue, but I'm trying to catch up!

On the table I have a pair of pants that only need heming, before I can move on to some winter projects


vendredi 17 mai 2013

White Jumpsuit - Pattern details

Here are some additional deets on how I put the white jumpsuit together.
I was able to find some additional photos of the original jumpsuit online, which helped me figure out how it was made and where the seams where.
Now onto the Frankenpattern:
For the top part, I used Vogue pattern V8831:


It is a loose-fitting knit top with cowl neck, princess seams and two-piece dolman sleeves. I originally chose it  because it had the "custom fit" options, with different cup sizes to choose from. The two-piece dolman sleeve also turned out to be perfect. All I had to do was sew the top seam of the sleeve over the shoulder only, and leave the rest open to create the top slit.
I lenghtened the sleeve above the elbow to get the "hamac" effect, as well as below so that they would bunch up a bit on the forearm.

The princess seams where the only part that I didn't want, as the original jumpsuit doesn't have any bust shaping. My model is small busted, which made removing the princess seam easy, especially using the a-cup pattern (no sba necessary!), the curve was already pretty minimal. I just overlapped the two front pieces by the amount of seam allowance. Where the overlap was bigger, I added the difference to the side seam (which in hindsight I probably didn't need to do since I ended up taking at least 1 cm in at the sides  and back seam on the final garment). I did the same thing to the back pieces.

Overlapping the edges of the princess seam to get rid of them.
This only worked because I was working with an A cup and the curve was minimal.
For the pants, I asked K. to bring me a pair of well-fitting RTW pants to copy.
I looked online for different techniques on how to copy RTW without taking the garment appart and ended up following this tutorial, which uses painter's tape. I copied the front and back leg and left out the waistband.

I used painter's tape to copy the pant legs
then I pasted the tape onto tracing paper and added seam and hem allowances all around
Next, I needed to make the top and bottom into one single pattern, since I didn't want an horizontal seam at the waist. Instead of cutting the top on the fold, I added seam allowance to the CF and CB so that it would match to the pant's center seam (crotch).
To figure out where to connect the two, I measured the distance at the "center seam" between K's waist and the top of her pants when worn (below the waistband). I made a mark at the same distance on the top pattern below the waistline and drew a horizontal line perpendicular to the Center Front.
The top of the pant pattern isn't actually parallel to the floor so I  drew a line starting at the top of the side seam and perpendicular to the grainline. Then I overlapped the two lines, lining up the center seams. Finally, I trued up the side seam between pants and top and bam, I had a one-piece jumpsuit pattern!

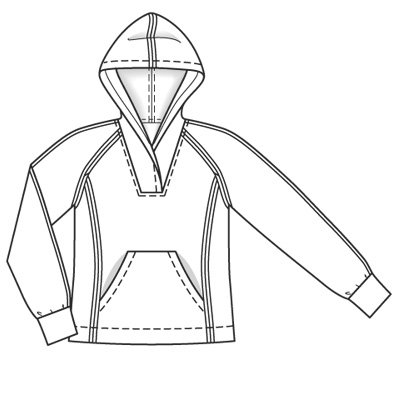
For the hood, I used the hood pattern from BWOF 118-11-2007 ( I was looking for hood patterns in my stash and randomly found that one).

The pattern has darts at the shoulder line, which made it easy to measure how much I needed to add to the front and back to match the top's neckline. Once i adjusted the back, I drafted the cowl addition to the front part of the hood to match the total length of the neckline.

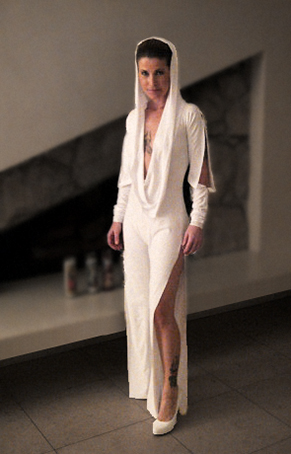
For modesty I didn't extend the neckline as low as the original jumpsuit, but I still wanted the cowl to drape lower than the neck opening so that it reached as low as the original. Instead of drafting a perpendicular angle at the bottom of the cowl I made it at an approx 120-degre angle. This meant I ended up with a point at the center, which I later recut on the garment to be round.


Inside the hood I added a small thread loop so that K. could use a bobby pin to keep it up over her head. Because of the added stay tape to prevent stretching, the seam allowance of the neckline where sticking up and showing so I stitched it down with a couple rows of topstitching which are hidden under the cowl.


Because the fabric was so stretchy, and the neckline so wide, I didn't need to add any sort of closure, which was another big time saver.

Here's a final comparison of the original and my copy...(You can see the neck opening doesn't go quite a low on mine but the neck cowl goes  about as low). Pretty good, eh?

dimanche 11 novembre 2012

Dump post: Miscellanious sewing and planning

Although I haven't been reporting much, I have been sewing quite a bit lately. I was on vacation for ten days in October and visited my family in Montreal. I made a shirt and a skirt for my step-brother's girlfriend. It was my first time sewing for somebody else, and I very much enjoyed it - so much easier to check the fit and figure out proper alterations!

I added one of Adrienne's lovely label to really finish off the shirt.
The shirt pattern is the same one I used for my ugly shirt, and the skirt is from the Burda October issue of this year. I made muslins for both. The shirt is what took me the most time, although by now I'm quite familiar with the step by step and how to put it together. I don't think that I used the seam ripper more than once this time! The skirt was really easy to sew. As a matter of fact I put it all together (except for the hem) in a few hours on my last day there. I actually really like this pattern, it's simple (no waistband) but very stylish and requires very little fabric (less then a meter). A perfect pattern for one of those end-of roll pieces that hang on the sales rack at Gala Farbics....

I don't have a picture of the finished garment, but it pretty much looked the same as rhis, in a dark green wool fabric

Speaking of fabric, the one for the shirt is from a store called Effiloché, on rue St Hubert in Montreal. It's a very cute yarn and fabric store, which also offers classes for both knitting and sewing. They only carry quilting fabrics, but they have a great selection of them and this one was perfect for this shirt. They also have a selection of gorgeous Liberty of London prints including this one, which was made up into a Sorbetto top on one of their dress-forms (drool...)


The skirt fabric is from C&M Textiles, another store on rue St Hubert, which carries a lot of quality fabric at reasonable prices. The wool was 17.00 a meter. We were helped by two older italian ladies who evidentally knew what they were talking about and gave us great service. If you are in Montreal or ever visiting the area, I would really recommend these two stores for fabric shopping...

Since I've been back, I have had quite a few projects lined up, and I am trying to figure out waht to start next:

Another, modified version of my ugly shirt pattern is in the midst of being put together. It has gathers at the shoulder yoke, and a hidden button placket.


I also want to make my first array into knit-fabric land, with a simple Renfrew top in a grey jersey...


... and this will be the perfect practice for another knit project, a dress made out of rayon fabric found at Gala Fabric in Victoria, BC


I'm actually hesitating between 2 patterns:


The first one is dress 101 from June 2009, to which I photoshoped long sleeves, and the second one is from February 2008, both from Burda Magazine...I might make muslins for both and decide after...I'm really longing for winter dresses, something comfortable and easy to wear but not too casual looking so I may end up making both.
Other projects in the cue are a faux-fur vest (the one I didn't get around to making last year) - I'm thinking a removable collar would make it more versatile.


I'd also like to make Sewaholic's Alma Blouse in a winter version with a light wool-type fabric.


Oh, and I almost forgot. A friend of mine is having a MadMen-themed cocktail party for her b-day on December 15th. As soon as she mentioned it, this dress popped into my head.
1950's inspired cocktail dress, BWOF 107-11-2007
It's not quite the right decade (more 50's than 60's) but it has a retro feel, while still feeling modern, and I could easily wear it on other occasions like office christmas party and such. I've already made a muslin for the bodice and it doesn't look too bad. I just have to find the right fabric for it. I'd love to be able to sew-up a little jacket in a matching fabric. I found this one in a thrift store recently and thought it would be the perfect shape. I might try to copy it...


That's it for now, my sewing list for fall/winter...

samedi 22 septembre 2012

Finished Project: My Ugly Shirt

I actually kind of love this shirt. So why ugly?

Well, when B. saw the fabric, and later when I started putting the shirt together, he said he didn't like it, it looked like it was faded by the sun or that grease had been poured over it and who knows what else...


Well, ok, I can understand that not everybody would like the colors...But personnaly, I'm in love with this shirt... I think it has to do with the fact that once again, I mastered a great fit after a few muslins.

When I found the fabric, I thought it would be perfect for a button-down shirt. I had another pattern in mind but not enough fabric for it so I settled on Burda 114 from April 2010.
The piping idea came from here and here. For once I actually found exactly what I wanted at Dressew. The brown piping is cotton but it has a wax-y aspect, with a bit of shine so it could be leather...


Alterations I made to the pattern:
- sba (my first ever, it worked like a charm to get rid of some under-the-bust wrinkles)
- sway back adjustment
- narrow back adjustment (lower back only)
- lengthened bust above the waist
- lengthened sleeves by 5 cm (2") and made them narrower as well - I would love for Burda to add an elbow mark and lengthen/shorten line on their patterns for easier adjustments.

I also had to modify the button placket slightly to incorporate the piping.


The last thing i had to do on the shirt was trim the armhole allowance and do an overlock stitch... As I'm trimming, I start thinking: better be careful, this is how one makes a hole in a garment...Well, sure enough, fabric from the sleeve got in the way and before I noticed,  I cut right through it...Wish i could just do Ctrl+Z on life sometimes...
I freaked out at first - no fabric left to recut a sleeve. But the hole was actually more of a slit and I managed to paste the two edges back together with fabric glue and with a tiny fabric scrap on the wrong side. I also added a square of fusible interfacing on the inside to make the patch stronger...
I was so upset at first, for being so careless. Thankfully the fabric is forgiving and it's hardly noticeable now. B. says if you're close enough to see it then you're too close...:)
 
Aside from that, and  a minor collar mishap, the shirt itself came together really easily.
And I am really truly happy with the final fit.
 
Buttons are horn, and as always, from Button Button. at $1 a piece, I liked them better than some plain plastic ones at $.12 just because of the uneven tones. I can never go cheap on buttons...


I know this is definitely a pattern I will be reusing, I already have a variation with gathers at the yoke that I want to make...more dart rotating action coming up, hopefully more successfully than that time.

This shirt is going to be perfect for fall, with skinny jeans and boots...For once I've finished something in time for the coming season...More Happy Dance action...