I wouldn't say that I only started running just so I would have an excuse to sew activewear... but almost.
I kind of became obsessed when I started following Dawn's blog Two on Two Off. I became really inspired both by her sewing productivity, and also by how athletic she was, running half marathons and such..all the while being a mother of 4...Anyways, hats off to this impressive lady, and soon I became obsessed with sewing my own tights and sports bra, etc...
As it happens, B. got really into trail running a couple of years ago, and after a while I figured I should give it a try, if only to see what all the fuss was about. So when he signed up for the Mountain Madness Hallow's Eve Trail Marathon, I decided to register for the 10km race. And there was my perfect excuse to sew some fun activewear!!! I won't lie, I was slightly more excited about all the pieces I was going to make than about the race itself.
Because the race was Halloween-themed, I thought I would use fun fabrics, rather than plain old black or grey. I found fabric with little superhero characters on Spoonflower and I knew it would be perfect for B (seperate post to come).
For me, I had my eyes set on something with skulls, and found a cool print from Spandex House.
Because
the race was in October, I knew I couldn't just run in a sportsbra, I
needed a top. I think someone had mentioned how good Icebreaker clothing
were for winter outdoor activity, all made out of warm Merino
wool...Since I was pretty set on making my entire outfit, I decided to
source out Merino fabric online, and sure enough, I found what I was
looking for at New Zealand Merino and Fabric.
I
got a little merino-crazy and ordered 5 pieces of fabric (on the left of the print). 3 destined to
become running/outdoor tops (orange, blue and black) and 2 to make everyday shirts (light grey for me
and probably a Henley-type shirt for B in dark grey.) Merino is just so soft and
cozy...I couldn't resist.
Once I had figured out my main fabrics, I put together a little mock-up of what i wanted the full outfit to look like:
For the patterns, the Cora tights by Jalie patterns
felt like an obvious choice right away (especially after seeing it on
Dawn's blog). For the bra i went with the Pneuma tank by Papercut Patterns, i liked the double straps and the tank version with a loose
layer on top. I chose McCall 7261 for the top. I had just enough fabric
to make the hoodie version, but I left out the pocket. I also wanted to make a
merino vest with Mc Call 7026 but I ran out of time (currently on my sewing table though).
I then started researching online where to source technical fabric: Fabric that was breathable and moisture-wicking. After looking through ebay and amazon i finally came accross Spandez by Yard, an online store that carries an impressive amount of technical polyesther and spandex, from mesh to jersey knit, to various weights of wicking polyester, etc... I got some black and blue poly spande from the M-200 line, and some black nylon spandex tricot mesh (used in the bra).
I
had never ordered so much fabric on the internet, and all at once. For a
whole week I got a new package in the mail everyday, delivered to my work. My
co-workers got to see the full extent of my sewing obsession!
And then it was time to get sewing. Of course, even with planning this project a couple of months ahead, I ended up finishing the last item on the week of the race!
I made the tights first. The pattern comes with a side seam, but because I was using such a bold print, and didn't want to cut it up and have to match it, I taped the side front and side back together into one piece that would wrap around the side.
I cut size Q based on my measurements, lengthenning to size S at the bottom. Unfortunately when I first cut the skull fabric, I didn't take the stretch into account. My fabric had a lot less stretch than what the pattern recommends (there's a handy little scale to test your fabric stretch on the pattern cover). So even before sewing the pieces together I knew the skull pieces would be too small.
Instead of re-cutting a bigger size, I slashed my pattern piece in half lengthwise and added about 2cm of width. I also slashed it horizontally accross the crotch and added 2.5cm of height. I also had to adjust the pocket piece (2.5 cm deeper), as well as the waistband.
After these changes I recut my skull fabric. The tights came together really fast and without any major difficulty. I used the patterns's recommanded technique for stretchy fabric: "First stitch: wide zigzag stitch along the edge of the fabric, without stretching the fabric", then "Second stitch: straight stitch 6mm from the edge, stretchy thefabric gently to preserve the seams elasticity".
I have worn the tights many times and haven't had any problems of stitches breaking, so I'd say it's a pretty realiable technique.
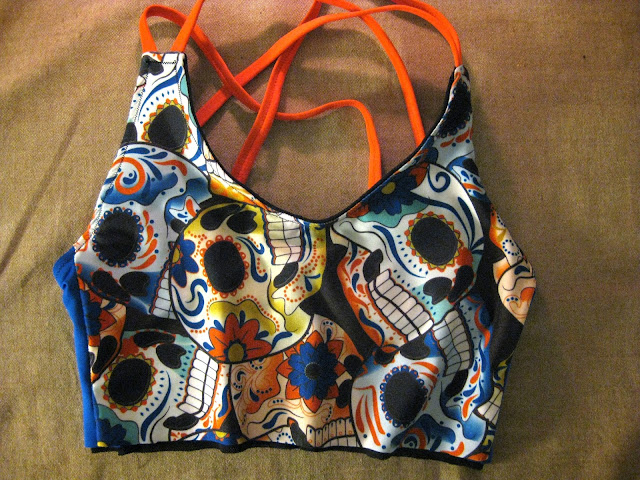
Next the bra. I won't go into much details as I've already written a full tutorial on how I added a lining and foam cups. As for size, based on my measurements, I cut between the two smallest sizes on the pattern and i didn't have to make any adjustments (see red line in photo below).
I used the main fabric for the front only, and used blue polyester wicking fabric for the back. I really like the contrast with the orange of the straps. Speaking of, those actually gave me the hardest time. I followed Sophie's tutorial on how to create elastic straps, but the turning over was a total pain in the butt. The safety pin kept un-hooking and I had to start over like 3 times. Those alone took me 2 hours to make.

Finally, the hoodie. I cut a size 10, added 2.5cm to the bodice and sleeve length, and removed about 3.5 cm in sleeve width. I originally planned on making the turtle neck version, but I had enough fabric to make the hood, so I went with that.
I think I also took in some of the hood depth when I was putting it together, I can't remember exactly. The merino fabric is pretty lightweight so the top turned out a bit more drapy, but I don't mind it.
You can't tell on the photos, but I used a slightly lighter thread to add a zigzag topstitching on the princess seams, the hood seams and the hem, just to give is a bit more interest. The hem is a little wonky, proabbly due to the light weight of the fabric, but I can live with it.
The fit of the top isn't amazing, maybe a little too loose, but it's really comfortable, and soo warm! I actually wore it over another long-sleeve running top and I didn't get cold at all. I've been wearing this top pretty consistently since I made it to go run at night, and it's a great layer.
So that's it for my active-wear sewing spree! (well, aside from the running tights that I made for B, photos to come in a seperate post). It was quite the project and it's got me eager to make more pieces. I'm currently completing the final item (black merino vest), but I'll most definitely make more tights and the tank version of the pneuma pattern is on my list for spring.
Active wear sewing is quite popular these days, with so indie pattern designers coming out with their ow patterns. Are you sewing activewear? what are your favorite patterns?


