Affichage des articles dont le libellé est flowery fabric. Afficher tous les articles

mercredi 16 août 2017

Finished Project: Summer Pants

This year has not been a very productive one so far - this is only the third item on my #2017makenine. But still, I'm chipping away at it, slowly!


I don't usually wear this type of looser pants, but I always thought it would be super comfortable, especially in the summer. I can't remember where I bought the pattern from, but it was probably on sale somewhere. As a matter of fact, I can't remember where I got the fabric either, possibly from Gala fabrics before the closed down their South Granville location.
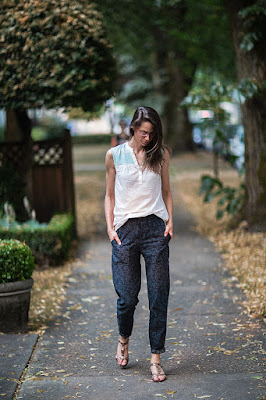

The fabric had been in my stash for a while. It's a medium-weight cotton, which makes it a pretty versatile fabric, suitable for a number of garments. When I first bought the pattern, I didn't remember about this fabric, until i went through my stash and figured it could be a good pairing. I didn't have any sort of emotional attachment to this fabric, so I figured I could treat it as a wearable muslin.

The pattern is Burda 6725 (from the "young" collection). Based on finished measurements on the pattern, I decided to cut the smallest size, size 32. I added about 3cm of length above the knee, and 2.5 cm below


After sewing the patch pockets on the front and back in place, I machine basted the pieces together to get an idea of the fit. It was pretty good right off the bat, but I actually though it might be slightly too snug, especially when sitting. So I decided to only use a 1cm seam allowance instead of 1.5cm. Later I ended up taking about 1 inch at the centre back seam, tapering to nothing at the crotch. So maybe I should have stuck with the original seam allowances...


Construction came together without a hitch, it was all pretty straight forward and instructions were clear. The one thing I had to adjust was the waist band. In the original design, only the right side extended into a tab that overlapped the left side. Somehow my waistband ended up slightly short at centre front, so I extended it by adding an 1"1/2 piece on the left to also overlap with the right side - allowing the button to be a bit more centered too.


The pattern also didn't include a "zipper liner" (not sure that this is the appropriate term), you know that piece of rectangular fabric that sits between the zipper and the skin. Not indispensable I guess, but probably more comfortable and it was super easy to add. All I did was cut a rectangular piece of fabric, folded it in half, and attached it along the zipper seam allowance on one side.


One thing that is tricky about pants (amongst all the other tricky fitting issues) is knowing where the waistband is supposed to fall. Burda magazine patterns often have an indication of where the waistband should fall compared to your natural waist. But when that information is not available (like in this case), I always have a bit of trouble figuring out how tight the waistband should be, so it falls in the right spot, and as a result, knowing if the crotch is deep enough,  if the hips are too big, etc...


So in this case, when I first basted the pants together, they seem to fit well, but after I put all the pieces together for good, it felt like the waistband was a bit loose and maybe hitting lower than it should? Hard to tell. In any case, the result is ok, not perfect but I can live with it. There's a bit of extra fabric below the butt and around the thighs that I would maybe try to get rid of if I sewed this again - which I actually might because these turned out to be very comfortable pants to wear on summer days.


vendredi 3 avril 2015

Finished Project: Peplum Top Knock-Off

Spring's here! (well, on paper anyway). I've been holding on to this post for a while because it felt so out of season until now. Truth is, this top has been finished since last fall, but I didn't take photos of it until a couple months ago, and I had more winter-ish projects I wanted to blog about first.

I fell in love with this Tibi top when I first saw it on the Glamourai's blog. I decided in the back of my mind that I would knock it off somehow. When I found the flowery cotton fabric at Dressew, I thought about the top right away and decided to go for it.


The original Tibi top has black trim going down the front and back, from neckline to waist. It doesn't seem to have any visible bust shaping, so I assumed the trim was covering all the shaping.

Rather than trying to rotate darts on a simple bodice block (which might have been easier, but who knows), I went on the search for a top pattern that would already have shaping at the neckline. Eventually, I landed on Burda pattern 121, from August 2012. It included darts at the waist, and pleats at the neckline, both of which could be turned into one princess-type seam. 


I did quite a bit of pattern hacking with this:

-Attached the shoulder yokes to the main bodice.
-turned the neckline pleats into darts
-rotated new neckline dart and waist dart slightly, so they would align more
-split front bodice in half lengthwise by turning darts into a princess type seam


I also made my usual set of adjustments:
-lengthenned bodice 2.5 cm
-added shoulder dart to avoid armhole gaping
-forward shoulder adjustement
-added an additional 1.5 cm to back harmole, this I think due to the style of the pattern and how far in the sleeves seemed to attach.
I didn't add any "princess" seam to the back, instead I just added the trim on top of the dart and continued it to the neckline.


After the first muslin, I noticed some gaping in the front armhole, and extra fabric accross the bust. I just pinned the excess and it seemed to work. I slashed the pattern from armhole to apex at an angle and overlapped the top and bottom about 2cm. On the center panel, I overlapped the same amount parallel to the hemline. I basically made a variation of a small bust adjustment to a princess seam, but reducing the armhole size at the same time.


That's quite a bit of pattern tweaking, but I don't remember it being that tedious, in the end I think muslin #2 was good, and I was able to go on to the fashion fabric pretty soon after.


But first I had to figure out the peplum portion. Looking closely at the original, I noticed that the peplum was pleated, with the folds lining up with the front and back trim, as well as the side seams. After a couple of tries, I finally figured that I needed a half-circle shape so it would have the right amount of volume (but not too much).
I started by measuring my waist (71cm)
From there, I determined that I wanted to add 6 pleats of 5 cm each once folded, so 10 cm unfolded, so 60cm of additional length. Total =131 cm at the waist.
I then used this fancy calculator to figure out the radius and other dimensions I needed.


I obviously didn't have any markings so putting the pleats together properly took a bit of fiddling, but in the end I managed to get what I wanted, with everything lining up nicely

The bodice and the peplum are both lined with cotton broadcloth. The lining of the peplum part was first sewed to the main fabric at the hem, then folded under and attached to the bottom of the bodice (main fabric & lining) with top stitching. the black trim around the waist covers the top stitching.


I'm really hapy with how this turned out. The fabric isn't as graphic as the original top, but it still looks pretty colorful. When I first cut the fabric, I spent some time trying to figure out how to line things up. I ended up lining the pattern somewhat in the back. In the front, I wasn't happy with the flower placement on one of the side panels, so I decided to forget about lining up the flower pattern (the trim creates a break anyway), so I recut that panel to get better flower placement.


If I'm completely honnest, this is definitely an "icing" piece. I don't wear a lot of sleeveless tops at work, because of AC and also I don't love showing my skinny shoulders and upper arm at work anyways. So I don't know how often I'll be wearing this, but regardless, I'm glad I made it, it was a very interesting pattern-experimentation type of project, and I'm quite proud of the finished garment...I might even leave it out on display on a hanger somewhere, I'd be fine with that.


I've finished quite a few projects lately, but haven't been able to take photos. In the meantime I've been trying to switch my sewing queue from winter to spring. I bought two more issues of Burda (because I needed more to pile up :P ), and I've already set my eyes on this particular dress, and maybe the cute summer raincoat from the "easy-2015" issue.


samedi 15 novembre 2014

Sneak Peek: Peplum Top

Even though this is another summer top, I was really determined to finish it this year, as opposed to make it a UFO for another year.


I'm hoping to have a chance to take modeled photos soon, but in the meantime. here's a sneak peek...

I also finished a knitted sweater and am now working on a skirt that will incorporate leather, as well as a knitted cardigan for B. So many projects!